Monday, November 29, 2010

Breaking out the barbie

With the warm weather well and truly here, it was about time I pulled the cover off my barbecue and fired it up again. I'd first planned to do some barbecued fish (p112) but when I saw the dubiously runny-eyed tarakihi available at Pak N Save yesterday, I changed my mind.


Instead, I left my barbecuing until today, when I wandered up to the Mad Butcher after work and grabbed a pack of sirloin steaks. On arriving home, I mixed up some barbecue marinade (p190) and started on a kumara salad (p177).


The marinade (a simple mixture of tomato, soy and sweet chilli sauce, with garlic and sugar) took only a minute or two to throw together. I had a steak marinating and was chopping up my kumara when Mum and Dad dropped in. Since I had a couple more steaks, I talked them into staying for dinner.


I coated the other two steaks in marinade and put the kumara on to boil. This was to be cooked until "just tender" but I'm afraid I got distracted chatting to my parents and watching Masterchef: the kumara was a bit soft for salad purposes by the time I took it off the heat.


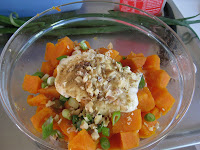
When the kumara had cooled down, I chopped it into chunks and added spring onion, mayonnaise, sour cream, a little curry powder, and some chopped walnuts. Stirring this through turned the kumara even more mushy, but never mind - it's not about how it looks, it's how it tastes, right?


I put the completed salad back in the fridge and took out the steaks. The barbecue had been heating up for around ten minutes, so I went and put the steaks on. I'm not very skilled at the art of steak cooking, so it's lucky none of us are terribly picky. I just cooked the steaks for as long as it took to throw together a green salad then took them off to rest.


The marinade on the steaks had scorched a bit - Mum tells me you're supposed to blot off the marinade before putting it on the barbecue. I'll have to remember that next time: I really didn't mind the charring taste-wise, but I hear it's not very good for you.


My steak and salad made a perfectly acceptable meal. Sure, the kumara was mushy, but it tasted a lot better than it looked. And while I felt my steak was a bit overcooked, the marinade gave it a lovely flavour. (Mum and Dad both politely claimed that their steaks were perfectly cooked. I doubt it, but they got eaten anyway!)


So if you're looking to have an "outdoor cooking experience" in the near future, don't overlook the Edmonds book as a source for ideas. The barbecue marinade is easy and tasty, and if you're sick of ordinary old potato salad, why not try a kumara one? Just try not to overcook the kumara!

Saturday, November 27, 2010

Christmas is coming

That's right: four weeks from today, we're all going to be sitting around, holding our stomachs and groaning. Of course, certain aspects of the Christmas Day repast have to be prepared well in advance - like Christmas cake (p58)!


Over the past few months I've been trying to locate a 23cm square cake tin. There are several recipes that specify this size tin, but as one of them was Christmas cake, I had a fairly definite deadline for finding one. I'd almost given up and decided to use a slightly larger tin I had, when I finally found a 23cm at Riccarton Markets last weekend. Hooray!


During the week, I collected up the ingredients I'd need for the cake: mostly the 2kg of dried fruit (a mixture of currants, raisins, sultanas, dates, crystallised ginger, mixed peel and glace cherries) but also rum, almonds, orange juice and treacle (this last borrowed from Mum as I didn't deem it worthwhile to buy a whole tin for the use of two tablespoons). The cake was starting to get a bit expensive - $25 for the fruit alone - by the time I had everything!


Last night I put the rum, orange juice and some orange zest in my largest saucepan, and, after bringing this mixture to the boil, I took it off the heat and added the huge bowl of dried fruit I had ready. The idea is to let the fruit soak overnight, but the liquid didn't even come halfway up the pot, while the fruit came right to the top. I was worried that only the fruit at the bottom would soak adequately, so I stirred the mixture several times during the evening (and once when I got up to go to the loo in the night).


This morning I prepared to make the cake. Determined to make a good job of it, I read the recipe uncharacteristically carefully. The first thing to do was add the almonds, essences and some lemon zest to my fruit mixture. This sounds quite easy, but it was tricky to mix the added ingredients into the already over-full saucepan.


Next, I creamed some butter with brown sugar and the treacle. When it was looking nicely creamy, I began adding the five eggs one by one. While the mixer was going, I was also sifting flour, baking soda and spices into another bowl. So at the end of this process, I had a big mixer bowl with the creamed mixture, an almost overflowing saucepan full of fruit, and a bowl of dry ingredients. All of these had to be folded together.


The recipe says to "fold in sifted ingredients alternately with fruit mixture" This I did, scooping out portions of fruit with a ladle and folding it in, before adding some of the flour mixture, and so on. It was quite easy to begin with, but as the bowl got fuller and the mixture stiffer, it got harder and harder to fold the ingredients through. After adding the final ingredients I actually got my hands in to make sure it was all mixed through.


I'd carefully lined my tin with 2 layers of brown paper and one of baking paper before starting on the cake. Into this I now spooned the weighty contents of my mixer bowl. It filled the tin almost to the top, but since I didn't expect the cake to rise much, that didn't really matter.


I put the cake in at 150 degrees for 4 hours. That is, my oven timer only goes for one hour, but I set it at that and checked it on the hour for three hours. At the two-hour mark I placed a piece of baking paper over the tin to stop the surface of the cake overcooking; at the three-hour mark I decided the cake was nearly cooked and would dry out if I put it in for the full four hours.


So it was after 3 1/2 hours that I actually took the cake out of the oven. It remains to be seen whether this was the correct choice, but I'd rather have my cake a bit undercooked and dense than overcooked and dry. The cake has to cool in the tin (it's still quite warm, even after 2 hours), then I'll wrap it up and leave it in a cool place until Christmastime. Until then, I've got no idea whether it's come out any good or not - but I have every reason to be optimistic.

Tuesday, November 23, 2010

"Undeserving workmates" strike again

I've been keeping a spreadsheet with details of my progress through the Edmonds book. The point is to keep an eye on which areas I'm neglecting. For example, I've completed 13 out of 25 recipes in the 'Meat' chapter (or 52%), but only 6 out of the 33 recipes (18.18%) in the 'Sauces and Marinades' chapter.


One of the most neglected is the 'Sponges' chapter - partly because my first attempt at a sponge had been disastrous enough to put me off, but also because I couldn't make a whole sponge cake just for myself. Lacking any other plausable reason to make one, I fell back on feeding the workmates and made a three-minute sponge (p69) to take to work.


I'd also been lacking the correct cake tins. Most of the sponge recipes require 20cm sponge sandwich tins. I didn't have any of these, but recently borrowed my Nana's adjustable tin which is the same as mine, so I could finally produce two matching 20cm tins. Oddly enough, I had it in my head that square tins were required, but actually it doesn't say that in any of the recipes, and when I came to think of it, most sponge cakes you see are round. Oh well, square is what I have, so I'll have to work with those (at least for now).


I gather that the three-minute sponge is a bit of a short-cut recipe, since almost all the ingredients are just bunged in a mixer and beaten on high for 3 minutes. I'm all for shortcuts, but I still took careful note of the hints at the beginning of the chapter, making sure my eggs were room-temperature, and sifting the flour three times before adding it to the mixer bowl.


After the three minutes' mixing, I folded through some baking powder and attempted to divide the mix evenly between the two tins. This done, I stuck them in the oven to bake.


The sponges looked a little worrying when they were baking - they rose sort of lumpily on top. By the time I got them out, however, they didn't look too bad. I let them cool and packed them up to take to work - along with some of my raspberry jam, a shaker of icing sugar, and an electric beater.


I dropped into Pak N Save for a bottle of cream while I was over getting the mail this morning. Come morning tea time, I was standing at the sink, whipping cream and assembling my sponge cake. Once assembled, it disappeared fairly quickly, though the one complaint everyone had was that it was a bit messy to eat - I'd put so much icing sugar on the top (to disguise that lumpy surface) that we all ended up covered in icing sugar.


I was quite pleased with how my three-minute sponge turned out - Maybe it wasn't the lightest sponge I've ever tasted, but when compared to my dodgy sponge roll back in June, it was an excellent result. It also would have been better baked same-day, as it had dried out just a little overnight (but was I going to get up at 5am to make morning tea for my workmates? I don't think so!). On the whole, though, it was pretty good.


One positive result of this (apart from a yummy morning tea and another recipe ticked off the list) is that I'm not so apprehensive about tackling the rest of the sponges. Be prepared for more sponges to come - assuming I can come up with excuses to make them!

Sunday, November 21, 2010

Please Sir, I don't want any more..

There's a recipe in the 'breakfasts' chapter for Creamoata (p155). I hadn't given much thought to this, but I had a vague idea that Creamoata was some sort of porridgy stuff, perhaps a bit like semolina. I did notice that in the index, if you look up 'porridge' it directs you to the page of the Creamoata recipe. I thought this was a bit odd, but didn't take much notice.


It was only when, a few weeks ago, I was in the local supermarket, checking the ingredients for filled croissants in an Edmonds book on sale there, that I made a discovery: the Creamoata recipe had been renamed 'porridge'. Why? A little Googling filled me in on the fact that Creamoata, a New Zealand-made brand of fine-ground porridge oats, is no longer being manufactured. Interestingly, the iconic Creamoata logo was recognisable to me, even though I had no real recollection of what Creamoata was!


So, here we have our explanation: humble old porridge was merely a victim of the Edmonds book's understandable, but slightly irritating habit of specifying Edmonds or affiliated brands to be used in their recipes. Creamoata is (or was) just a brand of porridge. I didn't know quite what fine-ground meant, but the best substitution I could make was probably the quick-cook kind that I always use.


My usual slap-dash microwave method of preparing porridge would horrify a true porridge lover, so I was interested to see how it would come out on the stovetop. The first thing I noticed was that there was more water than I would usually use. A lot more: the recipe indicates 1 cup of Creamoata (i.e porridge oats) to 4 cups of boiling water, plus an extra half-cup of cold water.


You begin by making a paste with the porridge oats and the cold water, then gradually add in the boiling water. Boil for 3-5 minutes, and you've got porridge. Well, that was the plan, anyway.


It was clear from the outset that there was just way too much water. The porridge thickened up eventually, but it was a very unappealing texture - kind of like lumpy wallpaper paste. The porridge seemed to be mostly thickened water, with occasional lumps formed around a rolled oat, rather than a nice creamy bowl of oats.


I poured my unappetising breakfast into a bowl and added one of the suggested toppings: strawberries and honey. And while I do recommend strawberries and honey as a porridge topping, I really can't recommend you use this recipe for the actual porridge - that is, unless you prefer your porridge to be a thin, lumpy gruel!


Out of curiosity, I wandered back down to the supermarket this afternoon, to check whether it was just the title of the Creamoata that had been changed in the latest printing, or whether the recipe was actually different when made with non-Creamoata porridge oats.  Nope - just the title. So whatever kind of porridge oats you use, 4 1/2 cups of water to 1 cup oats is the recommended ratio. Recommended, that is, by the Edmonds book - definitely not by me!

Thursday, November 18, 2010

Don't go to Hell

Or Dominoes, Pizza Hut or whatever your local pizza place is called. Takeaway pizzas might taste good, but they're expensive and very unhealthy. You can make your own pizzas at home very cheaply, and then at least you can control what goes into/onto it.


Since my skinny little brother is staying with me this week, I decided it might be a good time to make pizza (p152) so I didn't end up eating the whole thing myself.


The Edmonds pizza recipe includes making the base from scratch. You can use bought bases, of course, but home-made is better, as long as you find a recipe that makes the kind of pizza base you like. The Edmonds recipe makes quite a thick base, so if you like a thin crust, you might want to look elsewhere for a recipe.


The first step in making the base was to sprinkle yeast over tepid water and leave it to go frothy. I was a bit dubious about my yeast - I'd had it for quite a while, and it was certainly past its best-before date. I wasn't sure if it would work or not. After 20 minutes, the yeast had frothed up slightly, but not much. We decided to go ahead with it anyway - otherwise we'd have had to go out and get some more yeast.


I added the yeast mixture to some flour and olive oil, mixed it to a dough, and kneaded it for a while. It wasn't initially looking too good, but with persistent kneading it turned into a nice smooth dough. I covered the dough with a teatowel, and placed it inside a cupboard, where it would be out of the way, and hopefully warm enough for the dough to rise.


With that done, we moved on to making the sauce for the pizza. The sauce recipe is quite unusual in that it is based on a mixture of sauteed onion, carrot and celery. To this mixture you then add tomatoes (it says blanched and chopped, but we used canned ones) vegetable stock, and various herbs and seasonings.


My assumption was that if you chop the carrot and celery small enough, they'll break down into the liquid during the 30-minute simmer time. In accordance with this theory, we chopped them really small - luckily I had a willing kitchen hand around to help with the chopping.


When we had the sauce done, I pulled out the dough to see whether it had risen enough. Nope - in fact it hadn't risen at all. It seemed we shouldn't have taken the risk with that old yeast after all. In a last-ditch attempt to make it rise, I sat the bowl on top of the oven where it would be really nice and warm.


The sauce was still simmering, so we turned our attention to the toppings. The toppings in the recipe are fairly simple: ham, mushrooms and cheese. This suited me fine: it's very easy to go overboard with pizza toppings, and I've found that simple pizzas are often the nicest. I did, however, add a little salami, only because I happened to have some and I thought it would go nicely with the rest.


When the sauce was ready, I took another look at the dough. To my surprise, it had risen quite a lot in the warmer spot - so the yeast can't have been too bad after all. After a little light kneading, I spread the dough across the base of a pizza tin, and added the sauce.


The sauce had come out looking slightly odd. I'd been wrong in assuming that the chunks of vegetable would break down in the simmering: all the liquid had evaporated, leaving a thick, chunky kind of paste. Still, I spread it over the base - quite thickly, since there was so much of it. It looked a little less weird once it was spread on, and when we'd added the salami, ham, mushrooms and cheese, it actually began to look pretty good.


When got the pizza out of the oven 15 minutes later, the base had risen considerably, and the whole thing was looking mighty tasty. At first I wondered how on earth we would be able to get it out of the dish, but Jos managed to cut it and get it out slice by slice.


I'd had my doubts about the sauce, and the dough looked just slightly sticky, but when it came to eating the pizza, I really enjoyed it. The chunky sauce actually tasted really good, and the base tasted just fine. In fact, the thick base and chunky sauce made the pizza so filling that neither of us was able to eat more than two slices.


So I'm going to finish with two recommendations: firstly, try making your own pizzas. It's much cheaper, you can put on whatever toppings you want, and its not as much faff making the base as you might imagine. Secondly, give the Edmonds version a go. It might seem weird having veges in the sauce, but it tastes really good - and when you think about it: onions, carrot, celery, tomatoes and mushrooms... that's an awful lot more vegetable goodness than you'd get in your average takeaway pizza!


***********

Ok, so here's something a little embarrassing...

I came home today (having already written the above) and Joska says to me "so I read that recipe, and you're supposed to puree the sauce". I checked, and sure enough, there it is on the last line: "puree tomato mixture". Oops. So I guess the sauce wasn't supposed to be chunky after all. But never mind, it still tasted pretty great.

Monday, November 15, 2010

Waste of good scallops

I quite like scallops, as long as they're cooked by someone who knows what they're doing. Since I'd never cooked them myself before, I wasn't confident that I could make a decent job of scallops mornay (p118), but I still had to give it a go.


I chose to use frozen scallops, as they were cheaper and easier to find than fresh - and less of a waste if I made a hash of it.  I couldn't count them very easily in the packet, but there were definitely less than the two dozen needed for a full recipe. My guess was about 15.


The full recipe also required two cups of hot mashed potato, and I only had enough potatoes to make a single cup of mash. I decided on a half-mix, figuring that it wouldn't matter too much if I had a few extra scallops in there.


Having put the potatoes on to boil, I made a start on the sauce. It was the usual white sauce (butter, flour, gradually add milk, stirring..) but in this version there was enough milk to make the sauce very runny. I kept stirring, and eventually it thickened up a bit, but was still very thin when I added the scallops.


The scallops cooked in the sauce for about five minutes, at which point I removed them from the heat, stirred through some grated cheese, and poured the mixture into a casserole dish. The potatoes seemed cooked, so I drained them and mashed them, but it seems like they could have done with a couple more minutes to cook - no matter how much I mashed, the potatoes were slightly lumpy.


Trying to spread the potato over the top of the scallop mixture, I was even more convinced that my sauce was too runny. The potato sunk down into it and the sauce oozed over the sides. I finally got the potato reasonably evenly spread, sprinkled on  some grated cheese and paprika, and put the dish under the grill.


A few short minutes later, the scallops mornay was ready to eat. And I wasn't terribly impressed. The sauce was runny and tasteless, and the scallops themselves weren't particularly nice.


A little more attention to seasoning and a slight thickening in the sauce would have improved my scallops mornay, but I can't help thinking that even if you do it right, it really can't be the best way to eat scallops. Why drown something so delicate in a heavy, bland sauce? Then, it's topped with mashed potato, which, no matter how much we all love it, is also a fairly bland accompaniment.


Mornay or otherwise, I can't see myself cooking scallops again in the near future. I'll leave that to the experts: next time I eat a scallop, it'll be because I've chosen it off a menu!

Saturday, November 13, 2010

Worthwhile experimentation

The basic biscuit recipe (p35) has, aside from the main recipe, five variations. I've so far tried only the the lemon biscuit variation, which resulted in a huge number of plain little biscuits. They didn't taste bad, just a bit boring, and there were so many of them that I was thoroughly sick of them by the time I'd eaten them all.


With four more variations, plus the basic recipe, still to do, I had to come up with a way of making my future attempts more interesting. If nothing else, I could halve the mixture so I didn't wind up with so many!


It didn't take me long to come up with a plan. The texture of my lemon biscuits was surprisingly crisp for a fairly thick biscuit. What if, instead of making the biscuits as flattened balls of dough, I rolled it out and used cookie cutters to make nice thin, crisp biscuits?


I set out to trial my theory on the chocolate biscuit variation. Five minutes was all it took to whip up the dough; the only hiccup was in getting the dry ingredients mixed into my creamed ingredients - it seemed like there was too much flour. Eventually I abandoned my wooden spoon and worked the mixture by hand, finishing up with a nice firm dough.


I rolled out the dough and began cutting. My first batch was not very good, as the dough was fairly moist and didn't keep its shape very easily. When I went to pick up the rounds I had cut out, they merely smeared across the benchtop. Not many rounds from this batch made it onto the baking tray - mostly the mushed up ones went back in the bowl for re-rolling.


With the next batch, I shook quite a bit of flour over the benchtop and rolling pin. This made a considerable difference in preventing the rounds from sticking to the bench, and also in making the dough slightly less sticky as it absorbed the flour.


With the biscuits rolled so thinly, I didn't think they would need the 12 minutes specified in the recipe. With this in mind, I kept a close eye on the oven, and after the first couple of trays, I came to the conclusion that 8 minutes was about right.


Soon all the biscuits were baked and cooling on wire racks. Naturally I tested one at this point, and was quite pleased with the pleasant texture of the thin, crisp biscuit. It was still quite plain, though, so I put part two of my plan into action.


I'd already tried out all three of the chocolate icing recipes in the Edmonds book, but I'd been very disappointed in how the chocolate butter icing turned out. It was very sugary and not very chocolatey. I decided to have another go at this one, with a few alterations, and use it to sandwich my chocolate biscuits together.


On my last attempt at the icing, I'd noted "more" next to the cocoa, and "less" next to the icing sugar. with this in mind, I first beat three tablespoons of cocoa into the butter, and then added only enough icing sugar to make a nice spreading consistency.


This meant that instead of using 2 cups of icing sugar and 2 tablespoons of cocoa, I wound up with an icing made up of 3/4 cup of icing sugar and 3 tablespoons of cocoa. It was much richer and more chocolatey this way, and not nearly as sweet: the perfect icing for a dark chocolate lover like myself. Considering I reduced the dry ingredients so much, I probably didn't need the full quantity of butter - but by the time I worked this out, it was too late! I'll make a note for next time.


I used the icing to sandwich biscuits together. I'm not sure if the icing will set properly, but I guess it doesn't matter much. It'll still keep the biscuits together! Now, instead of 50-odd boring little plain chocolate-favoured biscuits, I have 25 rich, decadent chocolatey treats. Sometimes you get a better result from not following the recipe too closely.

Wednesday, November 10, 2010

Flawed planning

Not many people use dried beans these days. They're very economical, but it can be a bit confusing knowing exactly what to do with them - there's all that soaking and boiling, and not all of them need to be prepared the same way. Basically, most most people shy away from using them because it seems like too much hassle.


But is it really such an effort? I had a chance to find out when making bean salad (p175) this evening. Ok, so I had to soak my kidney, haricot and lima beans overnight. Where's the difficulty in that? It's not like you have to stand there all night and keep watch over it - just put your beans in a bowl, pour some water over it and go to bed.


The only problem there is in planning ahead what your dinner is going to be the next night, something a lot of us do anyway - it's really no different from getting some meat out of the freezer to thaw for tomorrow night's dinner.


When I arrived home this evening, I embarked on the next step: drain whatever liquid is left from the soaked beans, then put them in a pot, cover them with fresh water and simmer for 40 minutes. Not very tricky, is it? 40 minutes may seem like a long time, but since I put it on and went to watch Masterchef, I actually ended up cooking them for a bit too long - at least, the smaller beans were a little overcooked, while the lima beans were, if anything, a little undercooked. That was due to my own inattention, though, and can't be blamed on the recipe or the beans!


I drained the beans and left them to cool, mentally congratulating myself for being organised enough to have the soaking and boiling done in time for dinner. That was, until I actually went to make the salad and realised I was missing a couple of the other ingredients. I'd been so busy telling myself that "beans are easy, as long as you plan ahead", that I'd actually forgotten to plan for the rest of the dish!


D'oh. A quick walk down to the local Supervalue remedied my lack of onion and parsley, and I was soon adding them to my beans to make the salad. Instead of the French dressing specified, I used some leftover mustard dressing from last week - after all, it's just a variation on the standard french dressing recipe. The dressing, along with some sugar and garlic, went in with the rest of the ingredients, and, after quickly tossing it through, my salad was ready.


I was fairly pleased with the results of my bean salad. It tasted good, and if I'd been a bit more careful when cooking the beans, the texture would have been better - it was just a wee bit furry. I'm sure I'll do better next time. That's right - I haven't been put off using dried beans by the soaking and boiling: in fact I found it quite easy. I just need a little more practice to get the beans right. And next time I'll remember it's not just the beans you need to plan ahead!


Monday, November 8, 2010

You won't need your pick

I'm not sure why I decided to make rock cakes (p52) for my morning teas this week. I guess it was just the first recipe I saw that looked interesting. Rock cakes are basically just plain buns with currants and mixed peel in them. That might not be everyone's cup of tea, but it sounded pretty good to me!


It was a fairly quick recipe to whip up, too - just rub butter into flour, add sugar and fruit, then stir through beaten egg and a little milk. I think I used a little too much milk, because my mixture was just a bit wetter than it should have been. Oh well.


The next thing is to blob lumps of the rock cake mixture onto a tray. According to the recipe, there should be enough for 15 'rocky heaps',  but I barely got 12, and those weren't particularly large. Maybe they're supposed to be really small rocks. Anyway, the tray went into the oven for just over 10 minutes, and, a mere 20 minutes after first pulling out a mixing bowl, I had a nice tray of rock cakes.


I'd always assumed from the name that rock cakes would be hard and crunchy (hence the old "take your pick" joke) but actually they were lovely and soft. Quite plain, but the currants and occasional chunk of peel save them from being too boring.


I don't think they're going to keep very well though - even at morning tea today my rock cake was a little drier than the one I had last night. Still, they'll do me for morning teas for a couple more days at least - if they get too dry, I can always give each one a little zap in the microwave before eating it!

Saturday, November 6, 2010

Just call it a stew

It was only a couple of weeks ago that I made beef casserole. It was nice, but I had a few ideas about how it could be improved. Since there are several variations on this recipe, I wanted to try out another one while I still had these theories of improvement in mind. Luckily, a spell of grotty weather coincided with my having a certain amount of stewing steak that needed using, so it looked like a good time to have a go at beef and mustard casserole (p123).


Beef and mustard casserole follows the exact recipe of plain beef casserole, with one difference: you stir through a tablespoon of wholegrain mustard at the end. Still, by the rules I've set myself, it has to be considered a separate recipe. But since I've already made two of the four variations of beef casserole, I felt I was familiar enough with the recipe to make a few small alterations of my own.


The first thing I chose to do differently is to cook the casserole in the crockpot. Since the casserole uses stewing steak, long, slow cooking in the crockpot would be the best way to make the meat nice and tender.


Secondly, I didn't have the fresh herbs needed for a bouquet garni, so instead I just added some mixed dried herbs to the onions as I cooked them preparatory to adding them to the crockpot. The next issue to address was the excess liquid I'd noticed when I made the plain casserole. I doubled the amount of flour used to coat the cubes of beef, which achieved a better coating and would help thicken the casserole.


I also reduced the amount of liquid added to the casserole - in fact, I couldn't have put the full amount in if I'd wanted to: all the meat and vegetables in the crockpot (including some potatoes that weren't in the recipe, but I decided to add anyway) took up so much room in the crockpot that only about 2/3 of the beef stock would fit in without overflowing the pot.


I set the crockpot on low, and left it to stew away for about 8 hours. At the end of this time, the meat was lovely and tender, and the vegetables were cooked. Of course, in order to turn it from a plain beef casserole into a beef and mustard casserole, I stirred through the all-important mustard before turning off the crockpot.


Despite the extra flour and the reduced liquids, the casserole was again very thin and watery-looking. Well, it might look watery, but it tastes pretty good. I suppose I just need to think of it more as a stew than a casserole: then it's about the right consistency.


Instead of my usual dumplings, I served my stew over a generous helping of mashed potatoes (forgetting momentarily that I'd also put potatoes in the stew, but it didn't matter really) which was quite effective in absorbing the liquid and thickening the whole thing up.


This made a very pleasant meal, very much suited to a chilly day. The mustard didn't make much difference to the flavour, but I enjoyed the texture of mustard seeds amongst the meat and vegetables. Using the crockpot definitely made the meat more tender, so I'd recommend using one if you're making this recipe. My other slight amendments to the recipe made no great difference, but I'm still glad I tried them out.


So that's three out of four variations of beef 'casserole' under my belt - only one more to go! But I think I'll leave that one for a while: I've had enough stew for the time being!

Popular posts this week