Saturday, June 12, 2010

Queen of cake crumbs


 You may remember me mentioning that the date cake I made the other day was, while very tasty, also very crumbly. What I didn't tell you is that I carefully collected up all the crumbs from the cake plate, because I'd seen a pudding in the Edmonds book that had cake crumbs as an ingredient.

 
The recipe for queen of puddings (p212) specifies 1 cup of cake or bread crumbs. Despite my diligent crumb-collecting, I didn't have quite enough even for a half-recipe. I found a lonely hot cross bun in my freezer, zapped it, and pulled enough little bits of dough out of it to bring my crumb total to half a cup. I also ended up with quite a few little bits of fruit in with the breadcrumbs, but I figured that's all to the good, right?


I put the crumbs in the bottom of my smallest casserole dish, and separated an egg. I set the egg white aside for later, and beat the yolk with some milk and sugar. This mixture was then poured over the cake crumbs, and the dish went into the oven at 160 for 30 minutes.


The mixture was nowhere near set after 30 minutes in the oven. In fact, it was still completely liquid. I put it in for another 10 minutes, and another 5.. by the time it was set, it'd been in the oven for an hour. I'm not sure why it took so long - perhaps I should have put it in a shallower, wider dish.


Since I have never tried queen of puddings before, or even heard of it, I had no way of knowing what it was supposed to look like. It seemed set, but not solid. I had to assume that the odd gluggy texture was the desired result.


I allowed the base to cool before spreading jam over it - it should have been raspberry, but I substituted some of my homemade blueberry. Then I beat up the egg white with some sugar to make the meringue, piped it on, and put it back in the oven at 200 to cook the meringue.


A few short minutes later, it was ready. I have to say, the meringue at least looked pretty cool. I scooped myself out a bowlful, and had a taste.


Well, the meringue was good, though I wish I could have got it crispy. How do you get a meringue topping to go a little bit crispy on top? Mine always threatens to burn before it gets crispy. I suppose I could try a lower temperature.


The jam was good too, but I'm not at all sure that I got the base right. It was sort of eggy and gluggy - not bad, just a little strange. There was an occasional hint of peel or currant from the hot cross bun crumbs, which actually worked quite well with the jam. On the whole, it was not an unpleasant pudding (or breakfast! I had the leftovers this morning) but I'm not sure I'd bother with it again.

Thursday, June 10, 2010

Welcome back ... yesterday

Sue's been off work for the past three weeks, selfishly swanning about at home while I ran madly around, doing all her work for her (I'm joking - she was actually recovering from an operation). She was due back on Wednesday, so I decided a 'Welcome back, Sue' cake would be a good way to use up some of my leftover crumble topping.


I went to make the cake on Tuesday night, but immediately found it was a no-go: I'd used up the last of my flour making dumplings. It was late enough in the evening that I didn't want to go out and get any, so I flagged the idea for the time being. There's no reason why I couldn't bring it the day after Sue came back, right?


After work in Wednesday, I went for a walk up to the mall to acquire some flour. On the way I also acquired the company of a random child named Stacey, who joined me for a considerable distance before I finally, to my relief, convinced her that she shouldn't be straying so far from home. This conversation delayed my progress somewhat, and by the time I had got to the mall and purchased my flour, I found myself walking home in the dark.


I try to avoid being out alone in the dark, but since it was only around 5.30 and I was walking fairly busy streets, I did not experience anything worse than nasty blister. I sat down to eat some reheated beef and mushroom casserole (and dumplings!) before beginning the cake. Eventually I forced myself off the couch and went into the kitchen to begin my date cake (p48). That was, of course, until I opened the cupboard and found I didn't have any dates.

%^$%#$@!!!


I could have made another cake recipe that didn't require any dates, but the only ones I thought would go with the crumble topping needed 3 eggs - and I only had two. So I rugged up again and jumped in the car.


20 minutes later, I was back home with a packet of dates, and could finally begin making the cake. Since I didn't trust my scales, I used the chart at the front of my Edmonds book to measure out approximately 125g of butter (about 8 tablespoons), which was then creamed with butter, lemon juice and lemon zest.


The eggs had to be beaten 'until thick' in a separate bowl, then the dry ingredients sifted in another separate bowl. With the crumble topping in yet another bowl, and a small jug holding my chopped dates, the meagre space on my benchtop was pretty well swamped.


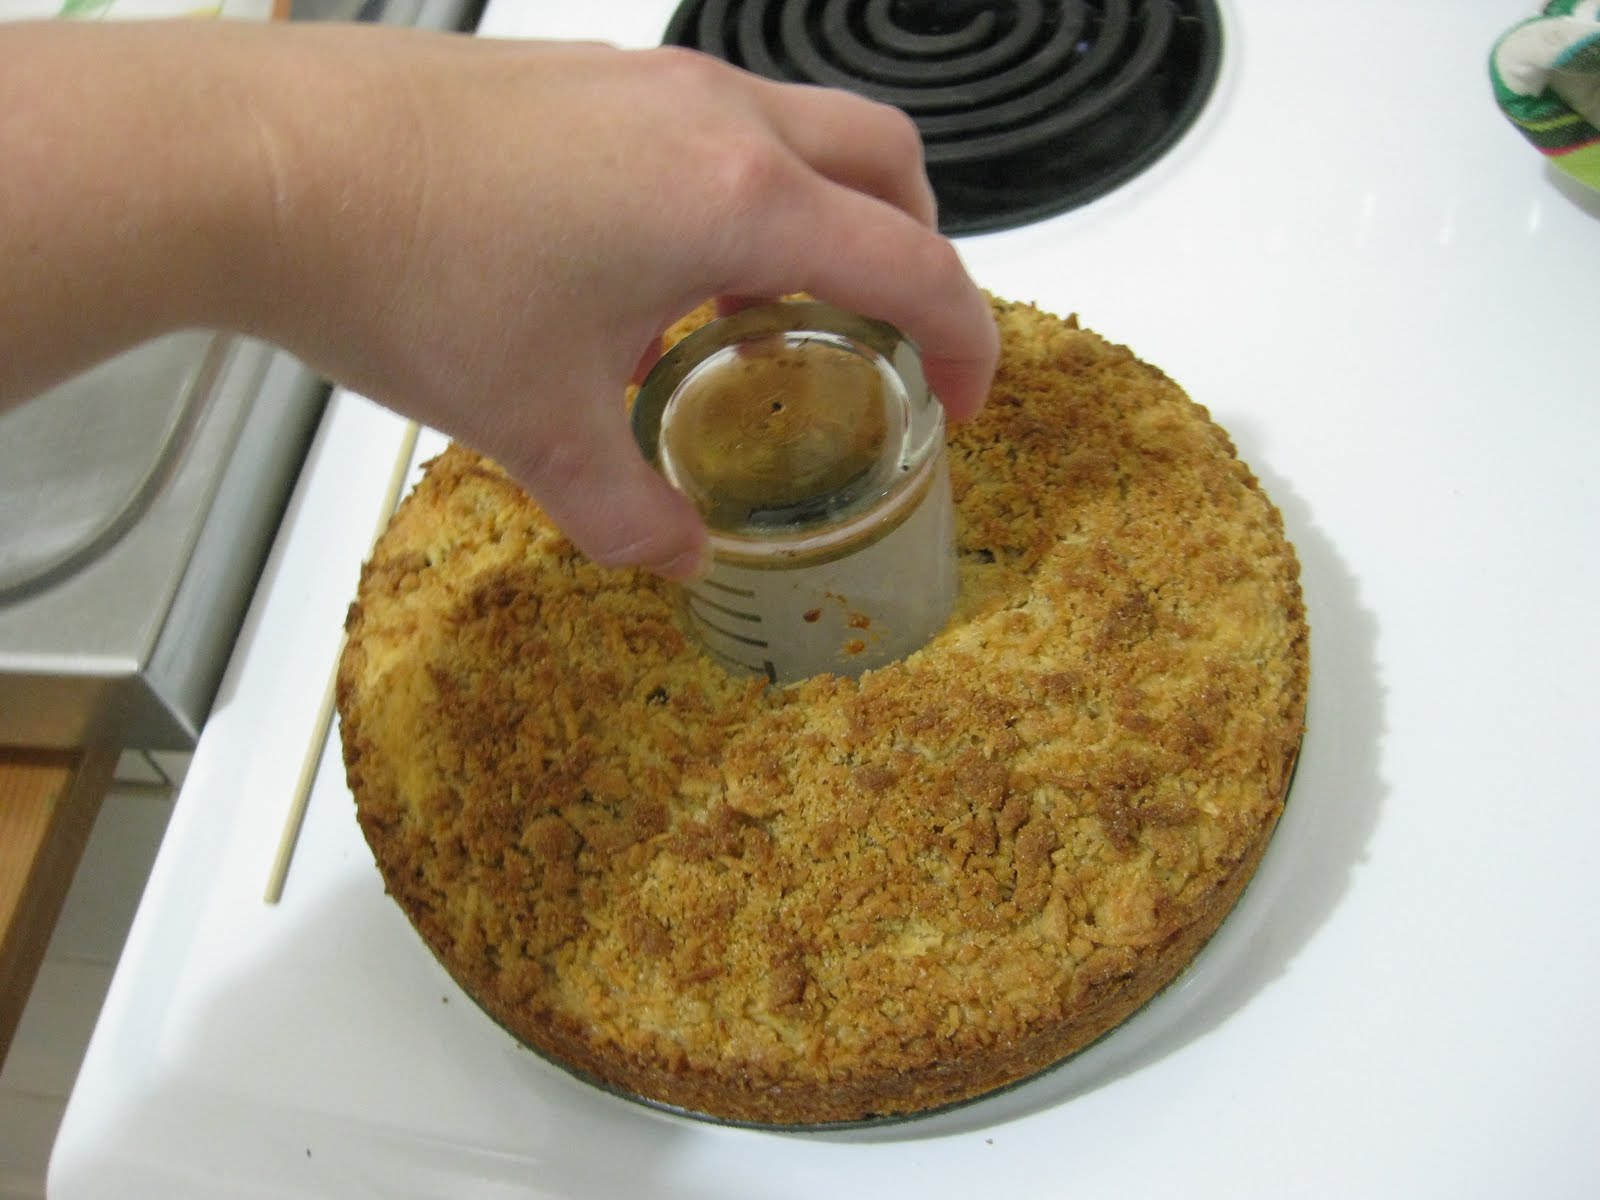
Anyway, you add the eggs alternately with the dry ingredients, add a little bit of milk, and fold in the dates. Then, since the recipe is for an 18cm ring tin, which I don't have, I pulled a shifty and used my normal tin with a small water glass in the centre. It was a bit tricky to spread the cake mixture smoothly around the tin without the glass moving off-centre, but it looked quite even once I'd finished. I sprinkled on a generous amount of crumble topping, and bunged it in the oven.


I still had a fair bit of crumble mix left, so I dug some stewed rhubarb out of the freezer, zapped it in the microwave, and used it to make a crumble in my benchtop oven while the cake was baking in the main oven, and I was cleaning up the kitchen. I had just enough time to scoff a bowl of my rhubarb crumble (SO good) before the cake came out of the oven.


It looked pretty good, and on trying it at work this morning, we found it tasted pretty good too. I was actually quite stoked with the way the cake came out - it was lovely and moist, and the dates went really well with the crumble topping. It's a bit crumbly and messy to eat, but it was totally worth two separate trips to the supermarket. Still, next time I'll try to be a bit more organised!


Tuesday, June 8, 2010

Any excuse for dumplings

I was sitting at my desk today, looking out the window at the dreary weather, and wondering what I could eat for dinner. When I did my grocery shopping in the weekend, I bought a frozen chicken with the intention of making another chicken dish this week. Of course, I hadn't taken it out to thaw, so chicken was off the menu for tonight at least.


A quick perusal of the meat chapter led me to decide on beef and mushroom casserole (p123), one of the variations of the standard beef casserole recipe. A casserole seemed like good cold-weather comfort food, and I chose this particular variation because it would allow me to use up part of the bottle of red wine that's been sitting open in my cupboard since I made beef bourguignon.


So, during a brief break in the weather, I popped across to the supermarket and got myself some blade steak, a carrot and some mushrooms. I'd see-sawed between doing a half recipe and a whole one, but I was sold on the half-recipe when I realised just how much 1kg of meat is - way too much for one, even if you're expecting to eat it for several days!


The casserole has to cook for 1 1/2 hours, so I got started as soon as I arrived home. First, chop and fry some onion. While that's happening, chop up the meat into cubes and flour it. Once the onion is cooked, place it in the bottom of a casserole dish, then brown the meat in batches and add it to the casserole dish as well.


The next instruction had me a little confused: "Gradually add stock (or in this variation, stock/wine) to saucepan, stirring." Well, I didn't have a saucepan out - I was using a frying pan as instructed. And I didn't see any reason to add my liquid gradually to an empty pan. So I poured all my liquid into the frying pan (why dirty another pot?) and brought it to the boil.


Once the stock/wine mixture was boiling, I added the chopped carrots, and, in lieu of a bouquet garni, a generous handful of mixed herbs and a bay leaf. It's all very well having recipes that state "one sprig of thyme" and "one sprig of parsley", but if you don't have any in your garden, you have to buy a packet or bunch of each herb every time. Nope, not this time: I'm happy enough with the mixed herbs.


While I was bringing this mixture to the boil, I roughly cleaned and chopped the mushrooms (I'd actually bought way more than I needed for my half-recipe, but I used them all anyway) and layered them on top of the meat in the casserole dish. After that, I pored the contents of my frying pan into the casserole dish, and got it into the oven. The dish was really quite full - and it's my biggest one! Now I'm really glad I didn't decide to do the full recipe.


I know I've already made dumplings, but I loved them so much that I was delighted to see the instruction "serve with dumplings" in the recipe. When the casserole had been in the oven for an hour, I mixed up some dumpling dough and added balls of it to the casserole for the final 20 minutes of cooking time. The casserole was already looking and smelling mighty tasty at this point - I couldn't wait to try it.


Shortly afterwards I was ladling out my dinner. You could argue that it's more of a stew than a casserole; certainly it has a lot of liquid. I guess it depends on your definition of 'stew' vs 'casserole'. I'd have to say, this casserole came out looking a lot more like my idea of stew than the Irish stew I made a few weeks back! Whatever you call it, it's still a good hearty dish for a cold wintery night.


I think this recipe would work quite well in a crockpot. I've still got to try out 3 other variations of this recipe, so I might well use the crockpot next time. But there's one thing you can be sure of: crockpot or otherwise, there's no way I'm leaving out the dumplings!

Monday, June 7, 2010

Visiting with cake

I'd arranged to go down to Rakaia to visit Bex on the Monday of Queen's Birthday weekend. I decided to bring her a cake, just for the sake of knocking off another recipe. It's hard to find reasons to make cakes, since if I baked one just for myself, it would go dry before I could eat it all.


There is a recipe in the 'fillings and icings' chapter called crumble topping for cakes (p77). I'd been quite keen to give this a go, and went looking for a plain cake to add my crumble topping to. I ended up choosing  butter cake (p45), not because I thought it was necessary to have the topping on a plain cake, but figuring that since I had to make the fairly boring-looking butter cake sometime, I may as well take the opportunity to jazz it up a little.


All went well for a start. The cake is very straightforward: the usual creaming of butter and sugar; adding eggs; sifting in dry ingredients... once I'd mixed in enough milk "to give a soft dropping consistency", I poured the mixture into the tin and made a start on the topping.


Crumble topping is a mixture of brown sugar, plain flour and coconut, with butter cut (or rubbed) in until it looks like breadcrumbs. I had all the dry ingredients in a bowl and went to measure out the butter. Actually, it was canola spread, since a) I'd run out of butter, and b) it's better for you anyway, and the substitution wasn't going to spoil the result of this particular recipe. I got out my scales, carefully set them to zero, added a spoonful of the canola spread, and was slightly confused to see that my fairly modest spoonful weighed 100g.


I didn't think that could be right. I took the butter off again, and found that the scales I had carefully set to zero were now sitting around 50g. So here's the explanation for my recent confusion with quantities of my food processor pastry. The reason why I found myself first with more pastry than I expected to have, and later with less, is that my kitchen scales are BUNG! I'll need to do a bit of experimentation to see just how bung, and in what way, but I think I'll be in the market for a new set.


With the dubious assistance of my now-known-to-be-bung scales, I estimated the 100g needed for my crumble topping. I started rubbing it in, but soon found there was just way too much spread for the dry ingredients. I got a bit flustered at this, first blaming the scales, then deciding I'd misread the quantity for the flour, and adding more, then realising I hadn't, and adding more brown sugar to match.


With one eye on the clock (Bex was expecting me for lunch) I ended up throwing in dry ingredients pretty much willy-nilly until there was finally enough to make 'breadcrumbs' of the mixture. I don't think the proportions ended up quite what they were supposed to be, but it looked ok: just generally crumbly, which is the main thing.  


I scattered about one-third of the crumble mix over the top of the cake and put it in the oven. There was way too much for one cake - probably because of all the extras I'd thrown in, but I also suspect that the original recipe is not designed to make only enough for one cake. It just says "sprinkle over cakes before baking", so I expect you're supposed to make a mix of this stuff and use it as you need it. Anyway, I have half a bowl of it left, so I'll need to think what else I can make with a crumble topping.


The cake baked happily away for half an hour, at which time I pulled it out to check it, and put it back in with a piece of baking paper over the top to stop the crumble from overcooking. I checked again after another five minutes, but decided to put it back in till the 40-minute mark. I had a slight scare when I was putting it back in and the baking paper caught fire, but I put it out no trouble and (carefully) replaced it with another piece.


When the timer went off again, I pulled out the cake, and it seemed cooked. I should have left it to cool for 10 minutes, then turned it out onto a cooling rack and so forth, but I needed to leave, so I wrapped the cake - tin and all - in a teatowel, and headed off to Bex and Richard's.


When I arrived in Rakaia (after a fairly unpleasant drive through truly grotty weather) I brought my cake inside, only to find that Bex had been baking too! So when it came time for coffee and cake, we were able to choose between Bex's very tasty chocolate cake, or my butter cake with crumble topping. Actually, we all ended up trying some of both.


The butter cake was really quite nice, though I think the cake was more successful than the topping - quite light and fluffy, despite sitting in a hot tin all the way to Rakaia (I'd expected the bottom to get soggy). The topping was pretty much what you'd expect - crunchy, crumbly - but I don't really think it added much to the cake.


So the cake got the thumbs up from my taste-testers, though it left Bex wondering what she could possibly do with all the leftover cake. Rich tried to convince us he could eat all of it, but Bex chose the far more sensible option of spreading the joy (and the calories) by passing on part of both cakes to some neighbours. Hope they enjoyed it!

Friday, June 4, 2010

Good Kiwi tucker


I had about 300g of food processor pastry left over from my quiche the other day, so when I arrived home last night with no idea what I was going to have for dinner, I decided I should use it for mince pie (p126).


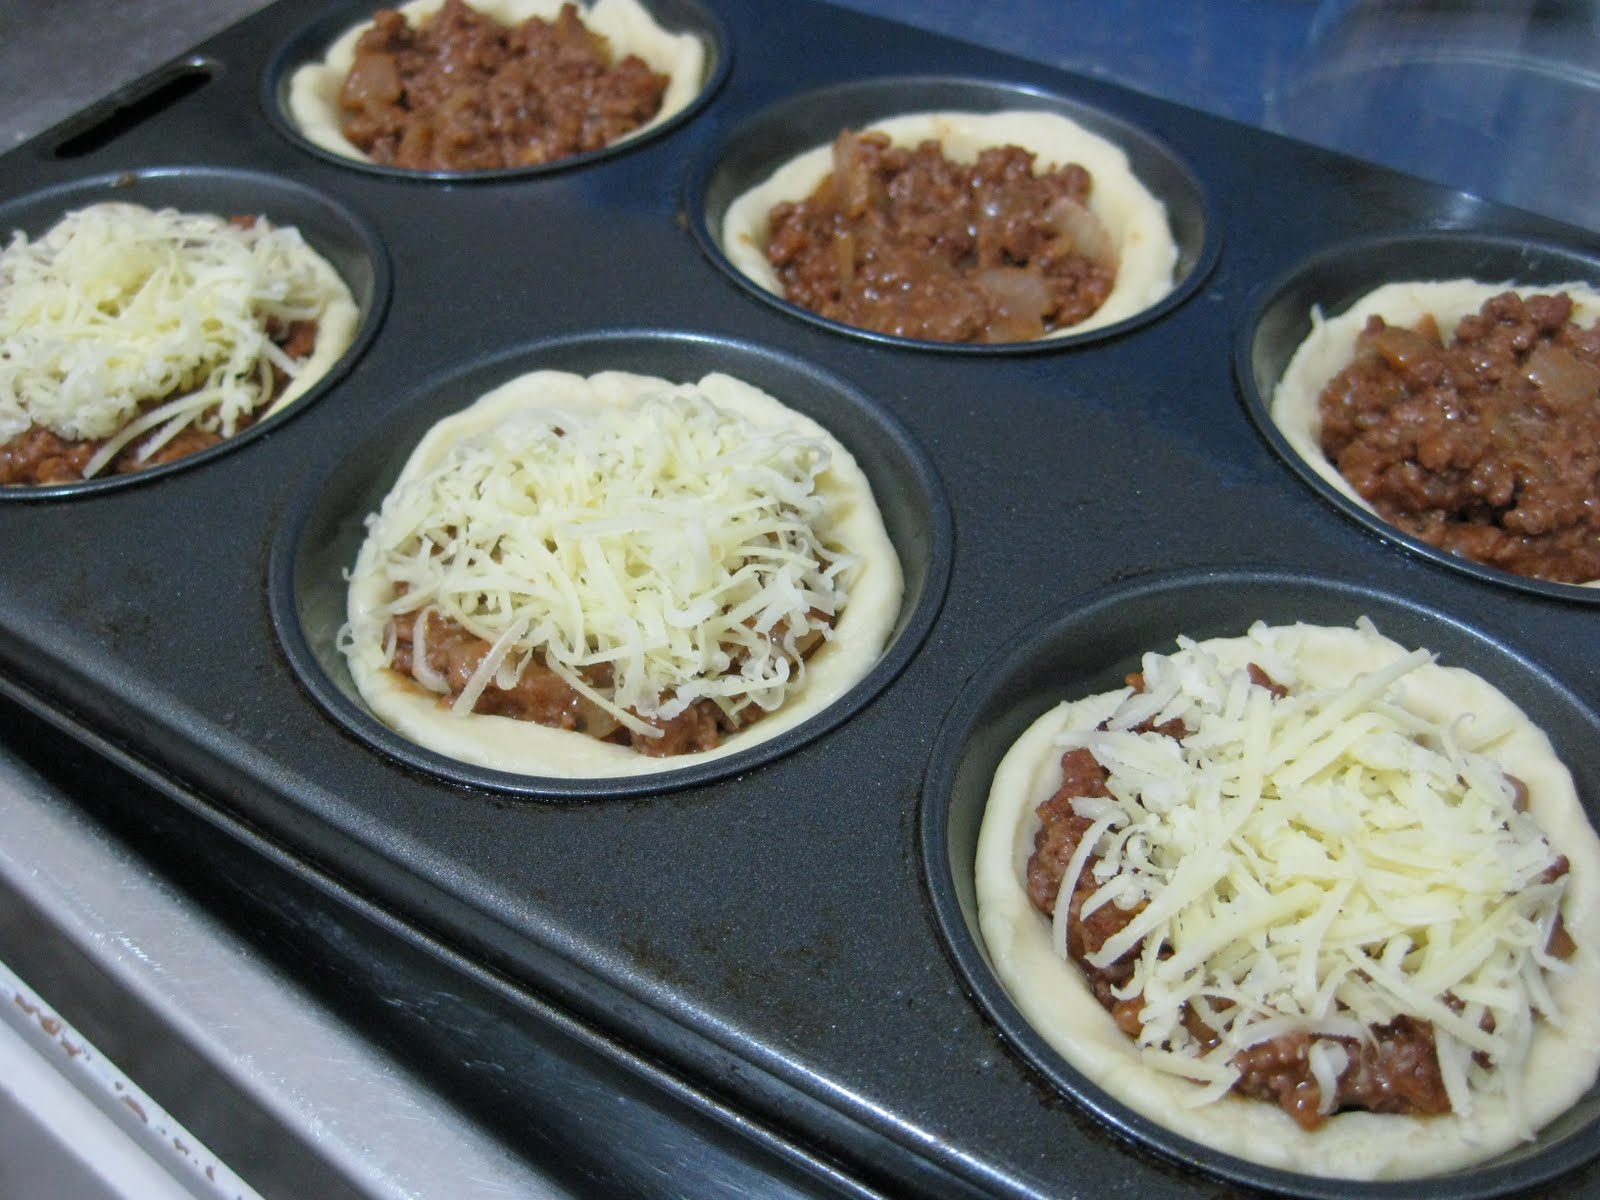
I didn't have enough pastry for the full recipe, which required 400g. The recipe is for a family size pie, and specifies a 22cm pie plate. I might have had enough pastry for my 20cm pie plate, but I felt like experimenting and decided to do individual ones in my muffin tins.


I checked my freezer for mince, but didn't have enough for the 3/4 recipe I wanted to make. Since it wasn't raining for once, this seemed like a good excuse for a walk. I wrapped up warm and wandered up to the Mad Butcher.


Returning home with mince in hand, I rolled up my sleeves to start making the filling, starting with chopping up an onion... except that when I opened the cupboard, there were no onions in there. I put my jacket back on and walked down to the supermarket to purchase a couple of onions.

Returning home with onions in hand, I again rolled up my sleeves, and this time was able to begin the filling. It's pretty basic; just fry up the onion with some garlic, then add the mince and brown it. Once the mince is cooked, stir through a bit of flour, then gradually add beef stock. Then you remove it from the heat, and stir through some tomato puree. Well, actually I didn't have any tomato puree, so I used tomato paste instead. Then I added a bit of seasoning, and set the filling aside to cool while I sorted the pastry.


I rolled out my pastry, and set about trying to find something about the right size to cut rounds for the muffin tins. I tried using one of my dessert glasses, but the rim was too dull to cut through the pastry, so I mostly ended up cutting around the glass with a knife. The first few rounds I made were way too thick, and I had to re-do them, but eventually I had a 6-muffin tray lined with pastry.


I filled my little pies, which actually used less than half of the filling I'd prepared. I'll have to do something else with the leftovers - I'm sure it'll make good toasties. Deciding to make half mince pies and half mince and cheese, I topped three of the pies with grated cheese.

I then moved on to rolling and cutting the tops of the pies. I really could have done with a little more pastry - I had to roll the pastry quite thin, and in doing so, stretched it too much so it shrunk down again when I was trying to fit them onto the pies


I got each pie covered eventually though, and after piercing the tops and brushing them with a mixture of egg yolk and water, I put them in the oven for 20 minutes (the recipe said 25 minutes, but that was for the family size pie. 20 was more than enough).


When they came out of the oven, they looked beautiful! All golden and flaky, and the cheese had oozed out of the mince and cheese ones. They tasted just as good as they looked: flaky, buttery pastry with a hot mince filling. Mmm...


Compared to bought pies, these are quite small, but two of them make a reasonable meal - one of each of course! The filling doesn't have as much flavour as you might get in a bakery pie, but that's something you could experiment with. It really doesn't matter though - nothing compares to eating your own homemade pies straight from the oven!

Thursday, June 3, 2010

Don't judge a recipe by its title

Last night I actually got to make a recipe I was familiar with: honey oat biscuits (p41). This was, in fact, the recipe I ended up making on the day when, flicking through my Edmonds book for something to bake, I had the thought that started this whole blog.


That day was the first time I'd tried making these biscuits. And, just like many of you are now thinking, I looked at the title and thought, "They're probably a lot like ANZAC biscuits". If you've already scrolled down and had a look at the photos, you'll be thinking they look pretty similar too. But while they look alike and have some ingredients in common, honey oat biscuits actually taste quite different.


They are made in much the same way as most biscuits: you start by creaming the butter, sugar and honey. Then you sift in the flour, baking powder and cinnamon, and add the rolled oats. This makes a fairly crumbly mixture, so you have to squeeze pretty firmly when you're rolling them into balls. Squash them down with a fork, and you're ready to go.


15 minutes later, your honey oat biscuits are ready. Though I would actually recommend a shorter baking time - I baked the first tray of biscuits for the full 15 minutes, and they came out slightly overdone, so when I did the second tray, I took them out after about 13 minutes, and they were perfect.


So what makes them different from ANZAC biscuits? Firstly the texture: you'd expect them to be either crunchy or chewy, just like ANZACs, but they're not. They are crisp on the outside and soft in the middle. Of course, the biggest difference is in the taste. They're sweet and cinnamony and very very moreish. The flavours are actually quite reminiscent of Dutch baking, which is probably why I like them so much.


I'd been itching to make these biscuits again since I began this challenge. They are a reminder of why I began it in the first place - because the Edmonds book is full of great recipes just waiting to be discovered; and because it's so much fun to cook something without knowing what it's going to taste like. This one just goes to show that even when you think you know what to expect, you can still be surprised at the outcome.

Tuesday, June 1, 2010

That's what I call a quiche

After experiencing the weirdly cakey result of last week's attempt at 'quick quiche', I was curious to see what the basic quiche recipe (p94) would produce. It occurred to me last night that I should try it, since I still had some leftover bacon.


The remainder of the bacon had been sitting partially frozen at the bottom of my 'temperature-challenged' fridge since last week. It was looking a bit borderline: I had to either throw it out or use it. In the end I decided to tempt fate and went ahead with my plans for the quiche. Don't try this at home, boys and girls!


First I had to make some pastry. The recipe specified short pastry, and I decided to have a go at the food processor pastry (p80), which is a variation on the basic short pastry recipe. You have to have the butter and water very cold - the water wasn't a problem, since I had some in the fridge, but I had to grab the butter out of the butter conditioner and bung it in the freezer for a while to cool down.


I got tired of waiting about 15 minutes later. The butter wasn't really very cold, but I used it anyway. The pastry was pretty easy - just pulse butter and flour in the food processor until it looks like breadcrumbs, then gradually add water, and keep pulsing until it clumps up. It looked a bit lumpy and weird at first, but it became quite workable after a slight kneading. I stuck it in the fridge to chill for 15 minutes, while I did a bit of kitchen tidy-up.


I had to make the filling, so I figured I'd do that, and leave the pastry to chill for a bit longer. I was busy cooking up the bacon and onion when I glanced up at the recipe, and realised that the pastry actually had to be baked blind before the filling went in, so I was being a bit premature with my filling preparation.


I turned the frying pan down to low, and grabbed my pastry to roll it out. I'd been steadily rolling for some time when it occurred to me there was quite a lot of pastry for one quiche - I already had it wide enough to go over the dish, but it was still well over 1cm thick! I checked the quiche recipe: 200g pastry. I checked the pastry recipe: "makes 375g". D'oh.


I cut a chunk off my pastry and weighed what was left: still over 400g. What? How did I manage to make considerably more than 400g of pastry from a recipe that supposedly only makes 375g? Shrug, cut some more off. In the end I put more than half the pastry back in the fridge. Rolling out the rest was considerably easier than working with the full amount of pastry, so in a way, it was quite good that I had to cut some off.


Soon I had the pastry rolled out and lined my dish. I had just enough haricot beans to use as blind and fill the dish - or so I thought. When the pastry came out of the oven, it had risen underneath the blind, so I don't think there was enough weight on it.


While the pastry was blind-baking, I turned back to the filling. With the pastry issues I'd been having, I'd had to take the frying pan right off the heat. I put it back on to heat my bacon and onions up again. When they were hot, I added some flour, which was supposed to cook "until frothy". Well, I expect it was supposed to combine with the melted butter in the bottom of the pan, except with my extended cooking/cooling/reheating of the bacon and onions there really wasn't any. So the flour kind of just clumped around the onions. Oh well.


I added the milk gradually, stirring until it thickened up. Then the pan came off the heat, and just as the base was ready, I stirred through the eggs and cheese. I poured the filling into the base, and it all went into the oven to bake for 30 minutes.


I was pottering around the kitchen, cleaning up, when I realised I'd put an oven mitt down on a hot element (again), this time achieving an interesting spiral design as conrast to the stripes, and wafting a delicate aroma of burnt oven glove throughout the kitchen. Luckily I have an extractor fan above the stove, so the smell didn't linger for long!


After 20 minutes the top was looking pretty brown. I didn't think the filling was cooked yet, though, so I left it in for nearly the full half hour. I did end up taking it out a little early, since the top was really starting to look overdone.


Despite that, it was pretty tasty. The pastry was nicely buttery and almost flaky around the edges, though slightly soggy on the bottom. I suspect it could have done with a bit more blind baking. The filling was yummy too - you can't go past egg, bacon and cheese! I had a piece cold in my lunch today, and it was even better than straight out of the oven.


It's perhaps not the most wonderful quiche the world has ever seen, but it's quite tasty, and would be a good basis for experimentation. I'd like to try it using a smaller dish, making the quiche a bit deeper. And there's any number of things that could be added to the filling. But the thing I like the most about this recipe - it's definitely a quiche, not a cake.


Popular posts this week